
Blogging with Jekyll and GitHub Pages
It’s easier than you might think!
Basically:
- Get a domain
- Create a repository (or fork a theme)
- Download Ruby and gem dependencies
- Edit CNAME and _config.yml, change DNS
- Start writing!
- (Optional: Set up SSL and subdomain)
This will be a tiny walkthrough of what I did. Both for other people and my benefit since I’ll probably forget and have to reinstall stuff in the future. This guide assumes that you have (1) an email address, (2) a GitHub account, and (3) some ability to use a terminal.
1. Get a domain name
GitHub has a very nice student developer pack that gives students a free .me domain with Namecheap. While setting this up, Namecheap also has an offer for discounted .com domains ($5 for the first year instead of the normal price of around $10).
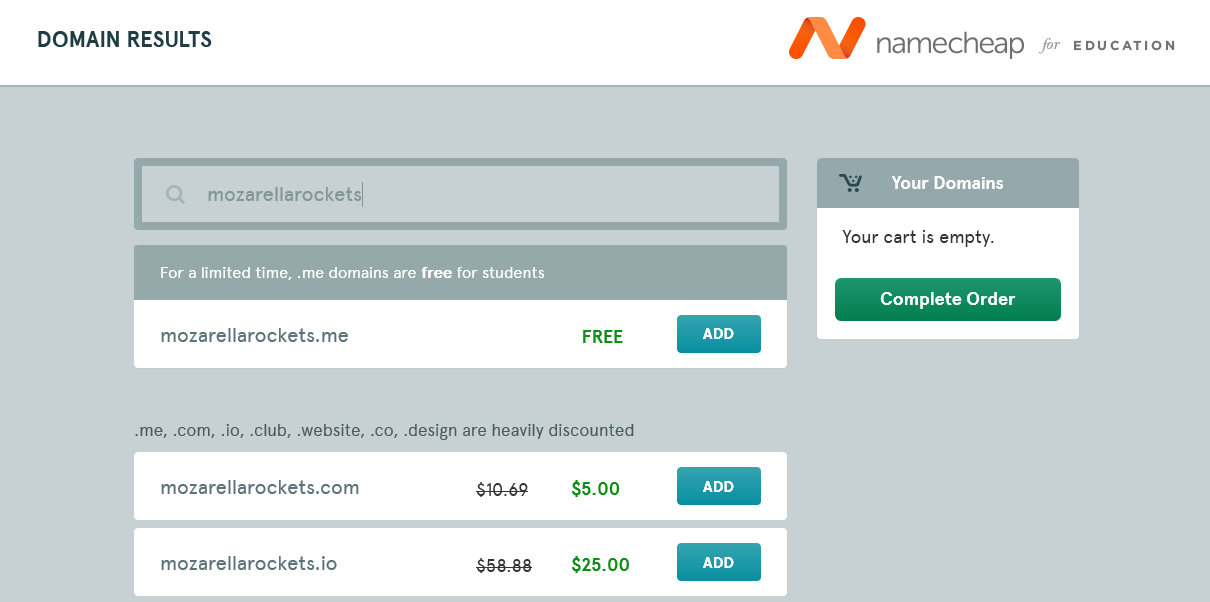
If you don’t want to pay $5, Freenom has free domains, although the TLDs they offer really aren’t as nice as .com or .me.
✅ 1. Get a domain.
2. Create a repository (or fork a theme)
Create a folder on your computer, then open your terminal of choice (on Windows, I’m using MinGW64) and change to that folder.
git init
Find a nice theme, and download/unzip or clone into the folder that you just created, then make sure that Git tracks changes to all of these files. Here, I used Scribble.
git add .
Now create a repository on GitHub’s website, initialize it with nothing (no README, no license). After you’ve done that, type this in the terminal to get your folder’s content online in your GitHub repository.
git commit -m "[your commit message here]"
git remote add origin [your repository link here]
git push -u origin master
✅ 2. Create a repository (or fork a theme).
3. Download Ruby and gem dependencies.
For the Scribble theme, Ruby <2.4.0 is necessary. On Windows, use RubyInstaller to download both Ruby 2.3.3 (at the top of the page) and the Development Kit (near the bottom). When installing Ruby, make sure that “Add Ruby executables to your PATH” is checked. This allows you to use Ruby commands in command prompt.
After you’ve installed Ruby, follow these instructions for the Development Kit. Watch out for the fine print! When you extract, be sure to extract into a folder with no spaces in any part of its name. I personally used C:\DevKit as in the guide.
Then, again using your terminal, change your directory to the folder with all of your blog files, and type gem install bundle then bundle install.
This downloads all the gems (which are Ruby’s libraries) necessary to run and build the site. Now, you can run
bundle exec jekyll serve -w
and visit your site at localhost:4000.
✅ 3. Download Ruby and gem dependencies.
4. Edit CNAME and _config.yml, and change DNS.
With Scribble, you should be able to see the following file structure:
scribble
|   404.html
|   about.md
|   CNAME
│   _config.yml
│   feed.xml
|   Gemfile
|   Gemfile.lock
|   index.html
|   LICENSE
|   README.md
|
└───_includes
│   │   head.html
│   │   pagination.html
|   │   signoff.html
│   └...
│
└───...
Open up the CNAME file and change it to the URL that you bought/acquired in the first step. In the _config.yml file, change all the appropriate fields to match the URL that you put into the CNAME. Commit these changes. On GitHub, navigate to your repository, click on settings, scroll down to the GitHub Pages section, and select your source as the master branch.
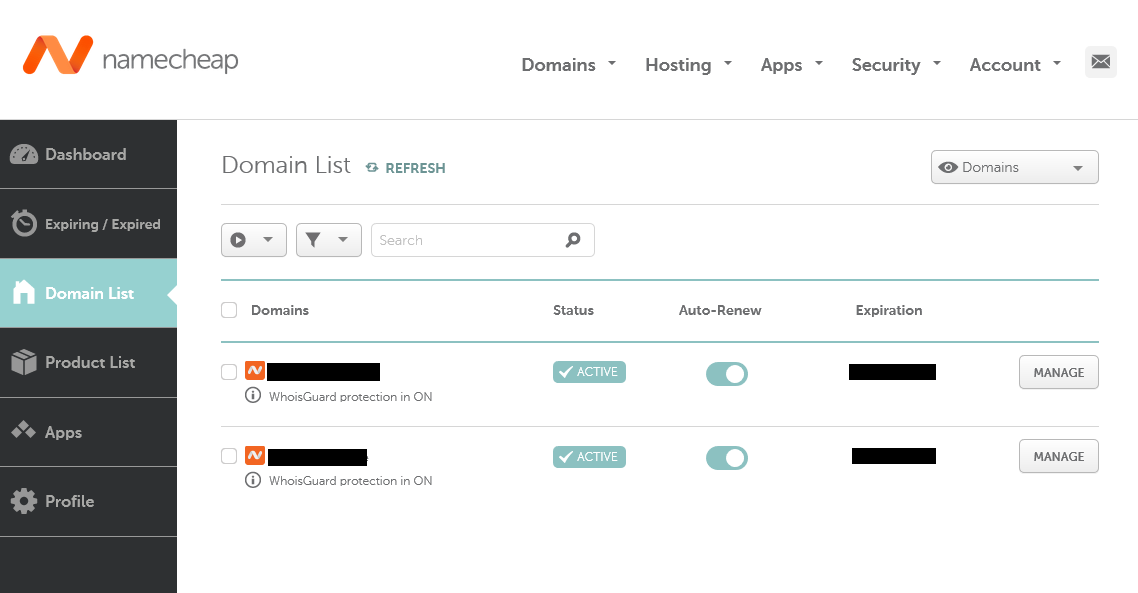
Now, with Namecheap, log in, check your domain list, and select manage on the domain that you intend to host your blog on. (As of 2017, it’s on the right!)
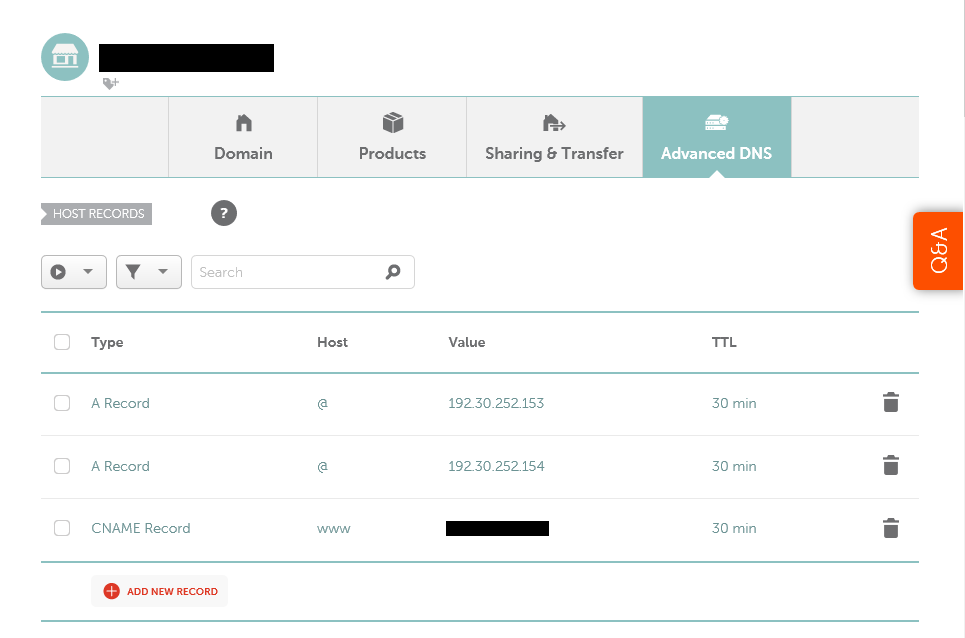
In the navigation bar, select “Advanced DNS”, then create an A Record pointing to 192.30.252.153, another pointing to 192.30.252.154, and a CNAME record with host www to your domain name.
Wait for a few minutes, make yourself a cup of coffee or tea or whatever it is that you enjoy drinking, and check back by trying to navigate to the domain that you created. You should now be able to see your blog online!
✅ 4. Edit CNAME and _config.yml, and change DNS.
5. Start writing!
The posts require that you format text using Markdown by default, but they support others like Textile as well. When GitHub detects that you have new Markdown files, they automatically convert your Markdown files into easy peasy HTML.
Each file has to start with YAML front matter block; for Scribble, all it needs is the title and date that you wish to attach to your post. For this post, it looks like this:
---
title: Blogging with Jekyll and GitHub Pages
date: 2017-09-16T17:56:48
---
When you’re done writing your first post, save your file as [ISO-8601 date][title].md in the \_posts folder, and delete the other placeholder ones. This is where you will save all of your posts.
At this point, all you have left to do is further customize layout, pictures, or other parts of the website to your liking. Just change the files in the images folder!
✅ 5. Start writing!
6. (Optional: Set up SSL and subdomain)
Setting up SSL
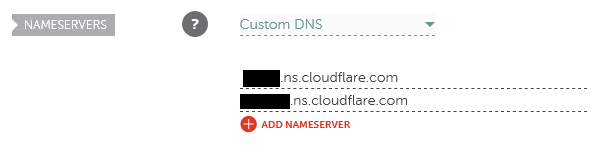
You may have noticed that GitHub disables automatic SSL when you have a custom domain. In order to get around this, Cloudflare offers a free plan for websites that also issues free SSL. To set this up, create an account, then add your website. Once it tells you to change nameservers, check out the screenshots below for Namecheap.
Navigate back to the “Manage” section of Namecheap.
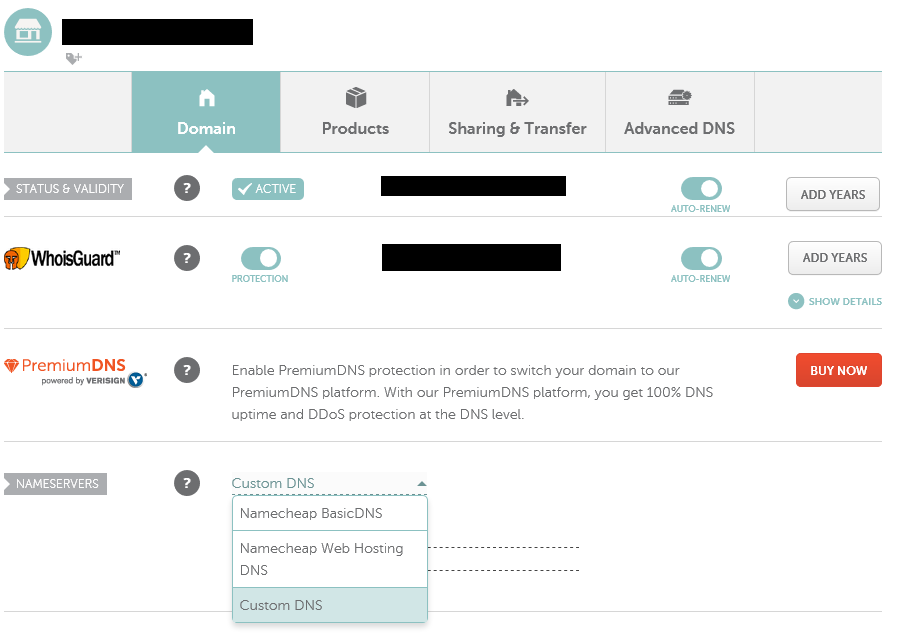
Replace the black bars with the nameservers as indicated on Cloudflare.
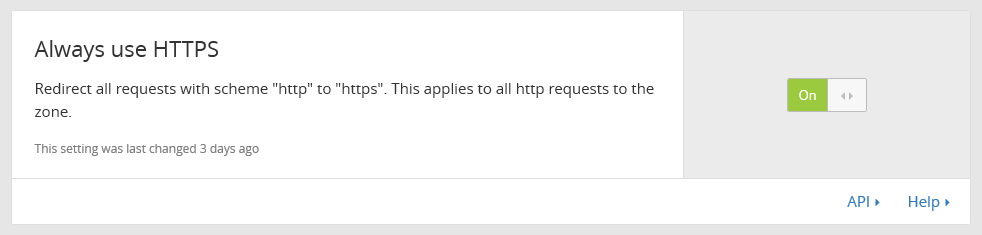
Once you’ve done that, wait for a few minutes as these changes propagate. You’ll get an email once CloudFlare detects the DNS changes. When you get that email, open Cloudflare and navigate to the “Crypto” section for your domain. Set SSL to “Flexible”, “Always use HTTPS” on, and “Automatic HTTPS Rewrites” on. This makes all your resources secure.
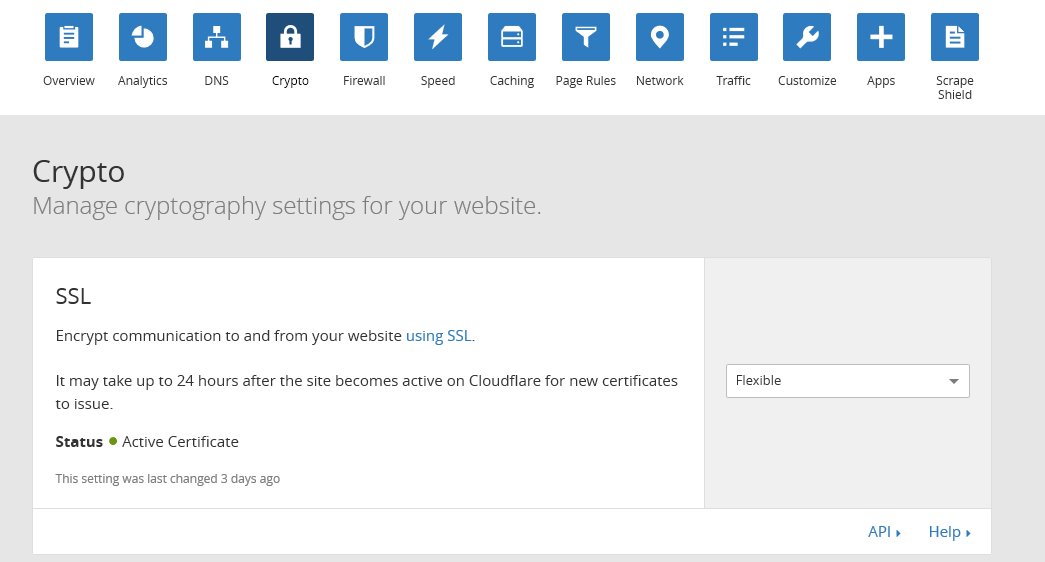

Your SSL certificate will take a few minutes to authorize, so don’t panic if you can’t access your website during this time! Use this time to discover inner peace and try your hand at interpretive dancing. I’ve heard that it really helps you to decompress.
When your SSL certificate is active, Cloudflare’s “Crypto” section will have Status: Active Certificate. Click over to “Caching”, and select “Purge everything” to see your site’s changes take effect. In order to not have a “Connection is not secure” warning on some browsers, you will need to also update your _config.yml file’s url to url: https://[your_domain].
In addition, you can navigate to the “Speed” section to auto-minify your HTML, CSS, and JavaScript to speed up loading of your website. I recommend doing this as well!
Setting up a subdomain
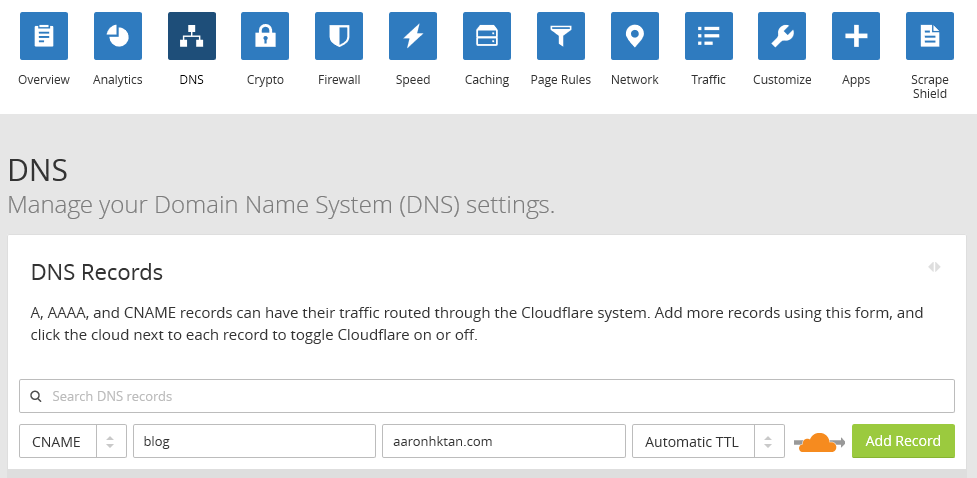
Now if you’d like to host your blog on a subdomain, like this one is (blog.aaronhktan.com), then it’s also just a few changes away. First, change your CNAME and _config.yml to your desired subdomain. On this blog, it’s set to be: blog.aaronhktan.com in CNAME and url: https://blog.aaronhktan.com in _config.yml. Commit these changes and push them to GitHub. Then, in Cloudflare, navigate to the DNS pane and add a CNAME record with the name of your subdomain and your domain name.
Now, your blog should be accessible wherever you wanted to it to be, and be encrypted for security.
✅ 6. Set up SSL and subdomain!
That’s it for now. I’ll update this guide if things change or if I realize that there are errors in some part. No guarantees though!
aaron at 17:56